How To Modify A WordPress Theme Correctly
Do you intend to alter your website’s WordPress theme? Users may easily switch out and maintain themes on their websites thanks to WordPress. You must keep in mind, though, that altering the look of your live website is a significant event. In order to avoid losing any data or website traffic, there are a few considerations you should make both before and after changing a theme. With the help of a step-by-step checklist, we’ll demonstrate how to properly alter a WordPress theme in this post.
Before Changing A WordPress Theme, Do The Following:
It only takes a few clicks to switch a theme, but there are some safety measures you should follow first. To make sure that upgrading your WordPress theme goes easily and that you don’t wind up losing crucial data, we advise that you go through the following checklist.
1. Copy Snippets from Your Current Theme
Some intermediate WordPress users prefer to add code snippets directly to their theme’s functions.php file to personalise their website. People typically forget about these modifications because they were made only once.
Make sure to browse through the files of your current theme and make a note of all the extra code you’ve included in the past if you or your web developer made these changes. This will enable you to add them later via a site-specific WordPress plugin or the functions.php file of your new theme.
2. Test Load Time
To examine the variations in page load times after making changes to your website, you should measure the speed of your website before changing its theme. You should make sure that the new theme is faster than your old one because WordPress speed affects user experience and SEO.
With a WordPress speed testing tool, you may examine the speed of your website. See our tutorial on how to do a site speed test for more details. Make sure to test how quickly the homepage and a few of your internal pages load.
3. Don’t Lose Any Tracking Code
Some users directly include the analytics tracking code in their theme files. Also, some WordPress themes provide options panels where you can put Adsense or Analytics code. Overlooking these codes is one of the most frequent errors made by newcomers.
To add the tracking codes to your new site after changing the theme, you must make sure you copy all of them. We usually advise users to add Google Analytics using a plugin like MonsterInsights to ensure this is future-proof, and for other tracking codes, we advise utilising the header and footer plugin.
4. Make a Full Backup
When changing your theme, it is generally advisable to make a backup of your posts, photos, plugins, and database. To make a backup of your entire site, utilise a WordPress backup plugin. Before continuing, make sure you download this backup to your computer. If something goes wrong, this step will make sure that you can quickly recover your website.
5. Sidebar Content
The addition of various widgets, such as social media links, adverts, subscription forms, or a contact form, is done using sidebars. Note these modifications. Make sure to copy and paste any custom code that has been added to a widget onto your computer so you can reuse it in your new theme.
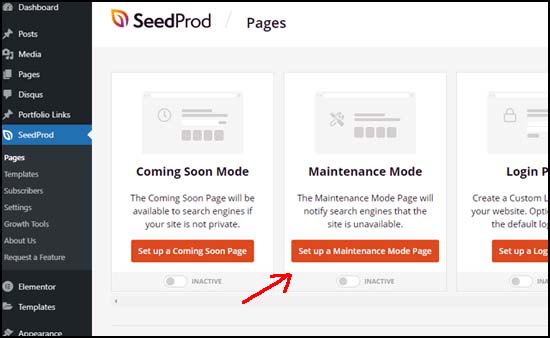
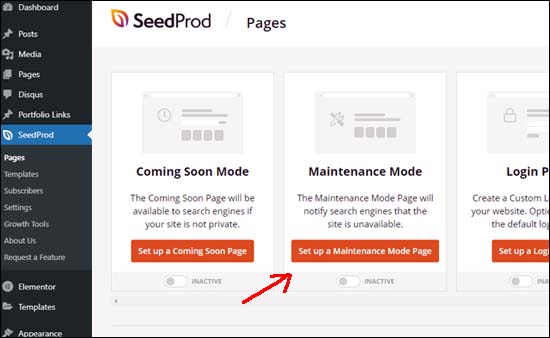
6. Keep Your Site in Maintenance Mode
When making updates to your website, it’s a good idea to place it in maintenance mode. You wouldn’t want your visitors to view a site that was still being built, right? For this, we advise employing the SeedProd plugin. With the help of this well-liked WordPress plugin, you can quickly and easily build stunning coming soon and maintenance mode pages for your website.

The free version of SeedProd can be used to activate maintenance mode. Moreover, there is a Premium edition available that integrates email marketing tools, offers greater customization options, and comes with pre-built templates. You need to install and activate the SeedProd plugin in order to maintain your website in maintenance mode. If you require assistance, refer to our detailed instructions for installing a WordPress plugin.
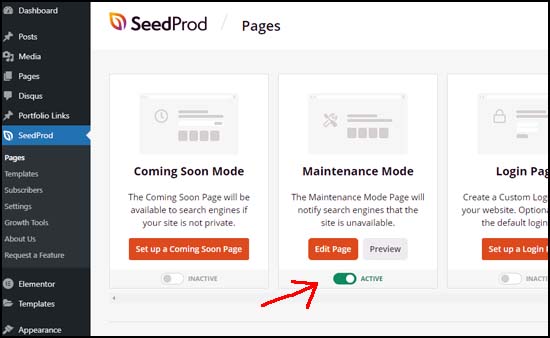
Then, click “Set up a Maintenance Mode Page” from the WordPress admin panel’s SeedProd » Pages menu.
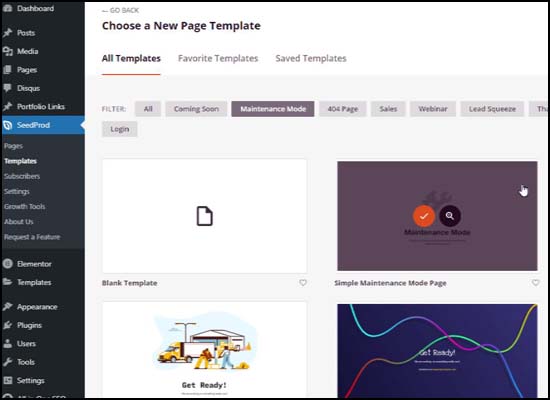
A template for your maintenance mode page must then be chosen. A blank template can be used to start from scratch and create a page. Simply hover over a thumbnail and click the check symbol to select a template.
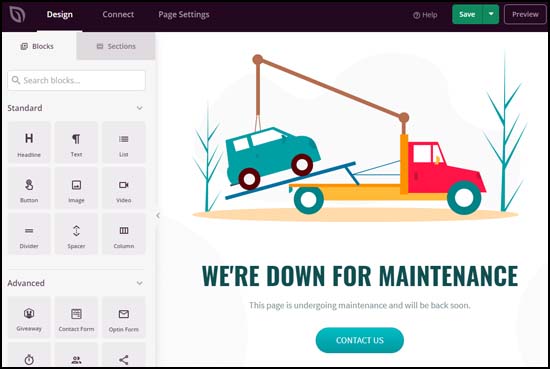
You may now edit your maintenance mode page using the drag and drop page builder in SeedProd. Drag new blocks from the menu on your left to create new ones instantly. You can add common blocks for text, graphics, buttons, and headlines with SeedProd. Advanced blocks are also available, such as contact forms, giveaways, social sharing options, and many more.
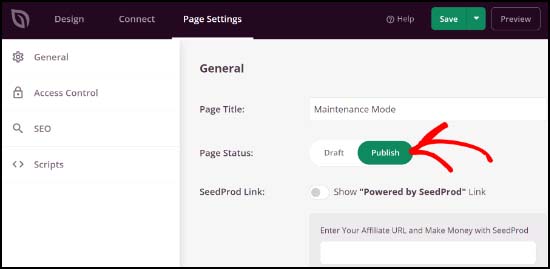
Don’t forget to click the “Save” button in the top right corner to save your changes. Following that, select the “Page Settings” tab and switch the Page Status to “Publish.”
After completing that, you may activate the maintenance mode by going to SeedProd » Pages. Simply switch the maintenance mode to “Active” to complete the task.
How to Install a Theme in WordPress?
Installing a theme for your website is the next step after taking the aforementioned security steps. You can choose from thousands of WordPress themes, both free and paid. You’ve probably selected a suitable theme for your needs if you’re reading this, which indicates that you have. The following WordPress themes come highly recommended if you haven’t already chosen one:
1. Divi
One of the most widely used WordPress themes available is called Divi. It is run on the drag and drop Divi Builder, which makes it simple to create any type of website. It includes 46 different content parts and more than 20 pre-built layouts. Each component of your website is simple to alter, and you can view the changes immediately.
2. Astra
Astra is a quick-loading and lightweight WordPress theme. It works with a variety of page builder plugins, including Divi, Beaver Builder, SeedProd, and Visual Composer. The theme is ready for translation and RTL. As a result, you can launch your website in any language and even make it bilingual.
You can simply construct an online store without any difficulty by integrating Astra with the WooCommerce plugin. Using the WordPress Theme Customizer, you may alter the header, footer, layout, and more. The basic website layouts that Astra includes are one of our favourite features.
3. StudioPress
The StudioPress team created the most well-known WordPress theme framework, Genesis. With the Genesis framework and other StudioPress themes, you can build stunning websites. In case you didn’t know, WP Engine, the most well-known managed WordPress hosting provider, now includes StudioPress in its portfolio. The best thing is that if you join up for any WP Engine hosting plan, you will receive 35+ StudioPress themes absolutely free.
4. OceanWP
A responsive and flexible WordPress theme is OceanWP. It provides a variety of demo templates that were created with various industries and enterprises in mind. It works with all of the popular page builder plugins. To advance your website, you may also employ other plugins.
5. SeedProd
The greatest drag-and-drop website builder for WordPress is SeedProd. You can utilise it to make a maintenance mode page, as we already suggested. But, it may also be used to generate a unique WordPress theme without the need for coding.
28+ expertly crafted themes are included in SeedProd to help you get started. Using pre-made blocks, smart sections, and WordPress template tags, you can effortlessly alter the themes. You must install the chosen theme on your WordPress website after making your choice. Any of the following 3 techniques can be used to install a WordPress theme:
- Using the theme search feature for WordPress
- Using your WordPress Dashboard, adding a theme
- FTP installation of a theme
How to Change WordPress Theme Without Going Live
You are prepared to change themes after you have installed your new one. It is, however, always advised to trial a theme before using it on your actual website. By doing so, you’ll be able to verify that the new theme is compatible with your current plugins and that everything is operating as you expect it to. You can modify your WordPress theme in one of two methods without making the change live:
1. Live Preview Option
WordPress by default enables you to preview a theme without modifying anything on your website. To do that, navigate to Appearance » Themes in your admin panel’s left sidebar. You may view any theme that is active on your website on this page. To view a theme in real time, simply click the Live Preview button while moving your mouse over the desired theme.
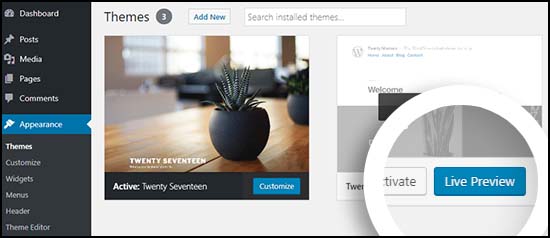
This will launch the WordPress Theme Customizer and display your new theme. Now that everything has been tested, you can use your new theme to make sure it functions properly.
2. Theme Switcha Plugin
Using the Theme Switcha plugin is another choice. You can test your new theme without turning it on. Installing and activating this free plugin is the first step. Next, from the admin panel’s left sidebar, select Settings » Theme Switcha.
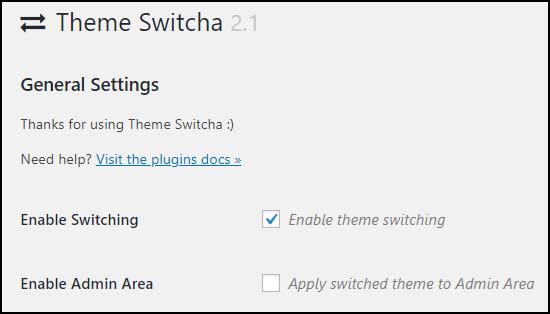
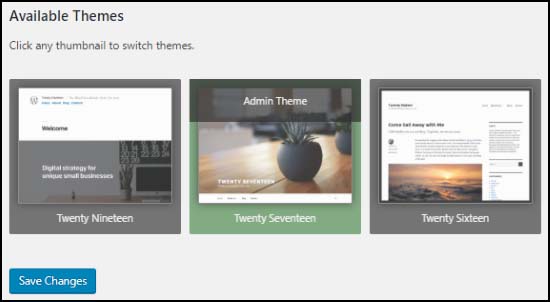
You must check the “Enable theme switching” box on the Settings page before clicking the Save Changes button at the bottom of the page. All of your installed themes will now be shown at the bottom of this page by this plugin. To sample your new theme in a new tab of your web browser, click it now.
How to Modify a Live WordPress Theme
It’s time to begin the process of changing the theme on your WordPress website once you have tried your new theme. To do that, navigate to Appearance » Themes in the WordPress admin panel’s left sidebar.
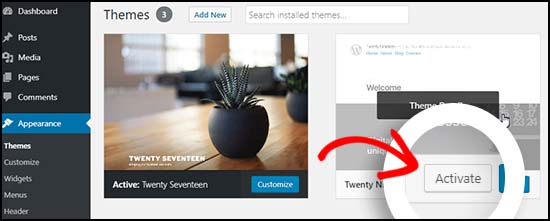
To switch the WordPress theme, you must hover your mouse over the theme you wish to use on this page and then click the Activate button. You may now view the new theme in action by going to the homepage of your website.
How to Manually Alter the WordPress Theme
Your WordPress admin dashboard may occasionally become inaccessible due to a bug. The procedure described above won’t work in that situation to alter the theme. You may either restore your website from a backup or fix the WordPress mistake that caused the issue in order to recover it.
But, you can manually change the theme with the use of phpMyAdmin if you don’t have a backup. By altering the data in the database, you can use this technique to tell WordPress which theme to use. To begin, open an FTP client connection to your website, then navigate to the /wp-content/themes/ folder.
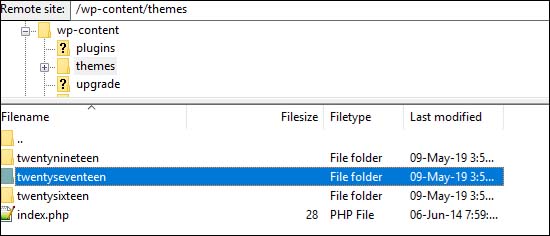
All of the themes that are currently active on your website may be seen here. If you don’t see a WordPress theme, you can also install it via FTP. The folder name for the theme you want to use should then be noted because you’ll need it later.
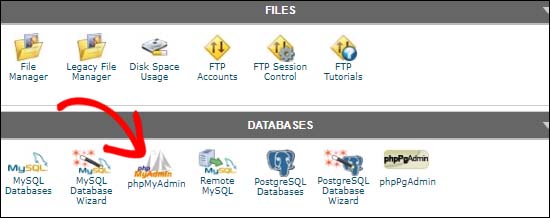
After that, you must access your WordPress hosting account’s cPanel. You must scroll down to the Databases section on this page before selecting phpMyAdmin.
On the left side of the screen, once you are in phpMyAdmin, you will see a list of databases. Simply click the database that your WordPress site is utilising.
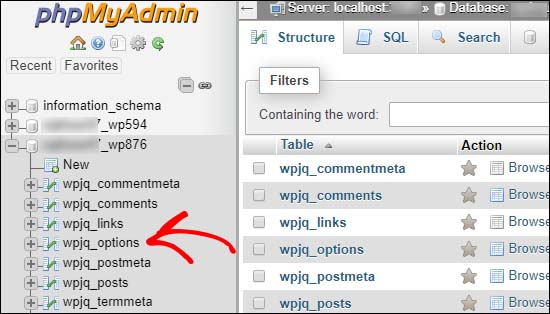
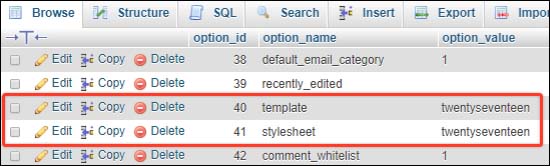
The list of tables in this database will then be displayed. To open the “wp options” table, you must click on it.
Note: WordPress automatically prefixes table names with wp_. As seen in the figure above, it is possible to have a distinct database prefix.
The template and stylesheet rows are now located on the right side.
The editor will then open after you click the Edit link in the “template” row. Here, you must replace the default value for the option value column with the name of the theme you want to apply. That generally matches the name of the folder you copied earlier from the /wp-content/themes/ folder.
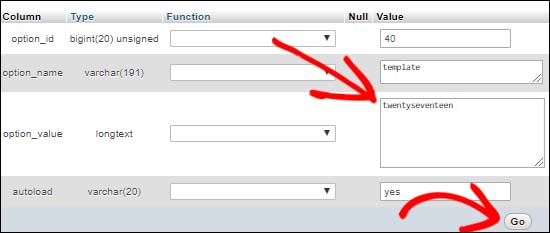
After finished, use the Go button to save your changes. Repeat the procedure once again for the “stylesheet” row. Visit your website to see the new theme in action after making changes to both rows.
After Updating Your Theme: What to Do
Before turning off maintenance mode after changing the theme on your website, there are a few things you need to take care of. The following list of actions to take after updating your WordPress theme is available for your review:
1. Test Your Website
Initially, you must confirm that all widgets, plugins, and features are in good functioning order. You should invest some time to evaluate your website and check out different aspects including the posts, comment area, photos, and the contact form.
2. Cross Browser Compatibility
Some objects frequently seem differently in different browsers. To make sure that your website looks excellent in every major browser, you should test your site in several web browsers including Google Chrome, Firefox, Safari, and Internet Explorer.
3. Add Tracking Code
You need to add your analytics and Adsense tracking code to your site after you’ve tested the functionality and cross-browser compatibility. The MonsterInsights plugin can be used to add the tracking code for Google Analytics. This will enable you to set up analytics correctly and monitor comprehensive website statistics directly from your WordPress dashboard.
4. Turn Off Maintenance Mode
To make your website live, you can turn off the maintenance mode. If you’re using the SeedProd plugin, all you have to do is navigate to SeedProd » Pages from your WordPress dashboard and switch the toggle to the “Inactive” position to disable the maintenance mode.
5. Test Loading Time
To check the loading speed of your homepage after switching themes, return to the Pingdom website. Then, contrast it with the loading time when your previous theme was on. If you notice any significant variations, you can follow our instructions to make WordPress run faster.
6. Monitor Bounce Rate
You should keep an eye on your site’s bounce rate after changing themes. Your site’s bounce rate could go up if your new theme is unintuitive and difficult to utilise. To decrease bounce rates and boost page views, you can add related posts, a widget for popular topics, and breadcrumbs.
Humbly Request To All Visitors!
If you found above both downloading link expired or broken then please must inform admin by fill this Contact Us! Form